This blog post is part of a series featuring how photo organizers use photos in their own personal projects. We hope they inspire you on your photo organizing journey. Photo Organizer Chantal Imbach of Simply In Order shares how she helped her mother sort, digitize and archive her family photos.
A few months ago, I worked on a very personal and special project together with my mum: we sorted, digitised and archived her photo collection. Obviously, this is not a project that can be done in a few hours. To make it even more difficult… I live in Melbourne, Australia, and she lives in Switzerland–not quite around the corner. Here is what we did:
The Planning
First, we discussed the goal of the project. Not all photo organising projects have the same goal and it was important to be clear about why we want to do this and what we want to do with the printed photos as well as with the digitised versions.
In our case, we decided that mum is going to keep the original family photos and I would take away the digital ones to process them further. We wanted to preserve the best photos for future generations and make them sharable, first and foremost with my two brothers.
The Preparation Work
My only preparation work was to give mum instructions and to find someone who hires out the scanner I wanted to use.
In the weeks and months before I arrived, mum gathered all the photos throughout the house. This included framed ones, loose photos and albums.
Since I can remember she always felt guilty because she never did anything with our photos. The few albums we have were mostly done by other people. The furthest she got was having a shoebox per child (3). Even this was tricky because my brothers are twins and are hardly ever alone in a photo. So, in which box do you throw it then?
However, having mostly loose photos was actually a big, big advantage and time saver. Imagine how much longer it takes to scan photos if they are stuck in albums and possibly difficult to remove. In our case, we could easily use a high-speed scanner with a feeder which made it possible to finish the project in the few days we had.
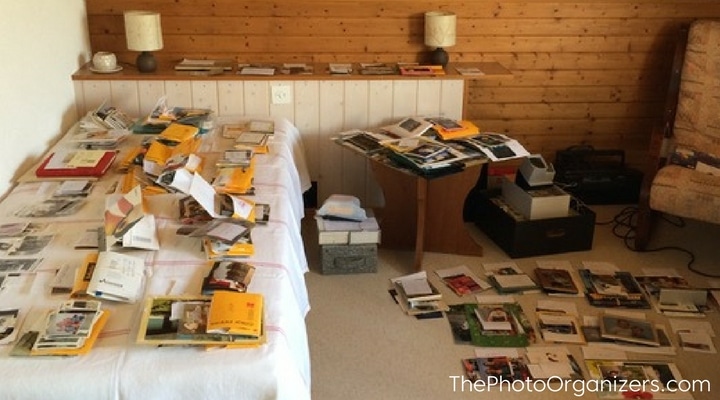
Once she had all the photos in one place – the spare bedroom – she started to sort them by year. If the capture date of a photo was unclear, it would go in a pile called ‘unknown date’. This is how it looked when I arrived:
The Decluttering and Scanning Process
As you can see, mum had done a lot of work already. The plan moving forward was that she would go through each year pile, declutter and sort them chronologically and by event within the year while I would start scanning.
It quickly became clear that this is not as easy as it might sound. We ended up working together: me holding the photo – she making the decision. That went a lot faster and I have to say, I was actually very impressed with her throwing out so many photos (about 3 bags full in the end).
The best part of this process was clearly the stories that emerged – happy ones and sad ones! She told me stories I had never heard before and we connected in a beautiful way.
Moving on, I then scanned the prepared year piles. Rather than writing information on the back of the photos, we used index cards. We kept it really simple. For example, it would say ‘Christmas 1979’ and behind it all the photos that belonged to that event. Sometimes it would be quite generic like ‘Spring/Summer 1988’. Obviously, because they were family photos I know who is on them in most cases and it’s not absolutely necessary to write it on the back. The index card can hold all the information you need. We simply didn’t have the time to write on the backs and we had decided to keep the originals as a backup only.
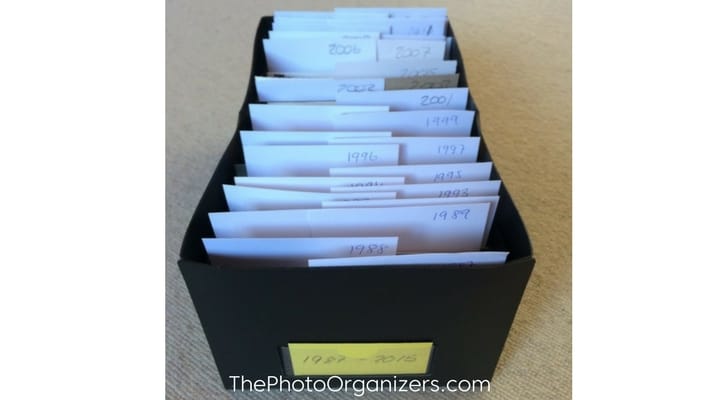
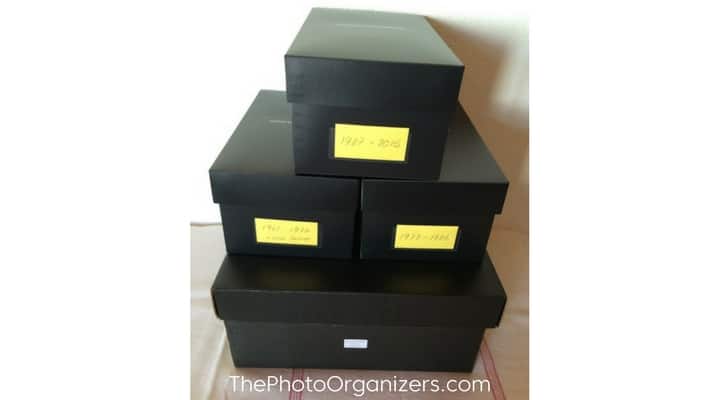
I always scanned the index card first and then the photos that belonged to it. This helps in the renaming process later on because I won’t have access to the originals that are now kept at my mum’s house in four archival boxes.
 Editing and Adding Metadata after Scanning
Because we didn’t have enough time, I didn’t rename the files or add any keywords or other metadata to the digitised family photos. We tried to do it as we went, by batch, but it would have taken too much time. I started doing this once I was back home and I still need to finish it.
The Results
Without the preparation work, it eventually took us about 160 (wo)man hours to sort and scan everything. We scanned almost exactly 4,000 photos including a few documents. The oldest photo we found was from 1900.
As mentioned, I have not quite finished processing all the family photos. Once I have added the necessary metadata, including the stories I heard, they will all be made accessible online for family members so they can download what they want to add to their own collection. Of course everything was and is always backed up at least twice.
Lessons Learned and Tips
What I learned along the way:
- Scenery photos are usually unimportant – in our case, most landed in the bin. The photos showing your loved ones are the ones that matter most.
- The ‘people’ photos are even more valuable if you have a story to go with it. Whether you jot the story down or record it with your phone or even a camera, make sure you record it somehow.
- The peace of mind knowing that the photos are digitised and backed up is invaluable.
- The joy of now being able to share these photos is enormous!
- It definitely changed the way I take photos.
Even if you don’t want to do the scanning yourself, if you still do have your parents, take the time to sort their photo collection with them, to record these stories and to connect. These family photos and stories are an important part of your life, too.
 Living in a beautiful but also very fire-prone area outside Melbourne, Australia, has triggered Chantal Imbach’s passion for keeping photo collections safe and organised so they can be passed on to future generations in a meaningful way.
She specialises in digital photo organizing, scanning and slideshows and shares more of her tips in her blog at Simply In Order Photo Organising.

Thank you for sharing -I look forward to the same project with my mother. Would you share which scanner you used for this. I especially like the tip on scanning the index card with the information as a time saver while working through it with your mom. I know how much time adding all the metadata can take.
Hi Lorelei, I used the Kodak PS50 for this project and was lucky enough to find someone who hired his out.
My mum is actually visiting at the moment and we are adding some metadata together, starting with the oldest photos. At the same time we update and add to the family tree :-).
Thanks for sharing this Chantal. What a wonderful project to do with your mom. Very helpful to see the process used when working on a short time frame.
Thanks Kathy, I’m feeling blessed to have a mum who actually wants to do this. She is currently visiting and we are adding metadata and uploading to Forever once done. That way they are not only safe but ready for her to look at when she gets home :-).
Really interesting to read about your beautiful experience going through old photos together with your mom. I wonder, how did you capture the stories and match them to the corresponding photos? Did you record the audio of your mother’s voice on the phone? As I understand, writing it down was not an option due to time constraints?
Peter, I have to admit that the way we did it was less than ideal. Some stories have been handwritten, but only the very short ones. Longer ones have mostly not been recorded in writing or voice. They’re in my and her head and we add them as we go.
As I said, this is less than ideal and not how one should do it … I should have added to the lessons learned that the story capturing needs to be part of the planning process, otherwise it is very easy to forget about it. This is kind of what happened and also because we were under quite a bit of time pressure.
Luckily, we are able to rectify this.
It is really great that you have lots of loose photos – I have also been working with my mom and lots of photos were cute into odd shapes in the 80s and 90s and put in books!
Oh dear, I’ve come across these with clients … It does make it a lot easier and faster if they’re not in albums and not too old and fragile.
What a wonderful gift, for both you and your mom. Thanks for sharing your process while inspiring others to do the same!
I’m wondering what scanner you used for this project? I’d like to do this with our photos!
Hi Erin, I used a Kodak PS50 scanner.
I did this several years ago for my in-laws. I put all their photos on a digital photo frame and gave it to them as a present. Every family holiday they would turn it on and people would stand in front of it and watch the pictures. Photos may be in album, but rarely are they taken out and shared like this digital frame was. It’s probably the best present we ever gave them.
Besides fire, in our part of the country we have tornado’s. After one hit several years ago, people in surrounding towns were picking up scattered photos and returning them to a single location where they were sorted and people who lost their houses would look through the stacks and see if they recognized any of the photos.
Reading your story again I’m wondering if you did any post editing to the scanned photos, and in that case whether you kept both the unmodified, scanned photo and the edited version?
Peter, Yes, I did post edit but not retouching or anything major. Basically crop, rotate, straighten and minor colour corrections.
Scanned with Kodak PS50, edits in LR and currently I’m adding metadata and renaming in Photo Mechanic.
To your question, I do keep the original, completely unedited scans for the time being because I haven’t finished yet. I am not sure whether I’ll keep them long term though. I will defenitely delete all the backups I did after each step once I’m done.
Wonderful and inspiring blog. Thank you for taking the time to write about your experiences and sharing it with us.
Thanks Kathy :-). I’ll be writing about the next step soon, ie how I process the scans further by adding metadata, renaming etc.
Hey Chantal! I hope you are enjoying the weather of Melbourne. It is freezing cold in New York here. Can you please inform how do you add meta data after Digitizing a picture. I have to do a similar project. I need to add original place date and place in the metadata of scanned pics. Thanks for your help in advance.
Hi Chantal,
Great job! I’m looking to do the same for my mother and grandmother this Christmas and am also based in Melbourne – could I ask where you found the scanner to hire?